When it comes to the roots of Hip-Hop, Rap and House Music production, one of the most contentious and important elements to these 3 styles is the technique known as sampling. Since the beginning, the craft of using a recording from one context and reconstructing it into another context has been one of the basic fundamentals to the Hip-Hop and House sound. It still defines the sound just as much so today. When it comes to mixing these kind of records, the mix really depends on the samples themselves and what effect they produce inside the song. Are the samples being used as the main melody/rhythm section, or are they being used to compliment the melody or subsequent rhythm section?
To understand how to mix sample-based Hip-Hop, House and other forms of sample-based music, we must first understand what sampling really is. It is generally defined as:
The technique of digitally encoding music or sound and reusing it as part of a composition.
Sampling pretty much falls into 2 different categories known as ‘Loop Samples’ and ‘Chop Samples’. For the context of this article, we will just abbreviate them to ‘Loops’ and ‘Chops’. ‘Loops’ are basically made either out of breaks (sections where the music is briefly incomplete) or made out of snippets of whole records and musical compositions (think 2 Live Crew, Dr.Dre, Puff Daddy produced records from the 90’s). In the former, space is given in the arrangement where other musical elements can be placed. In the latter, you are working with a full arrangement.
Chops are temporary audio slices of a record or sound source that can be copied, cut, pasted, rearranged, tweaked and re-tweaked. They can range from a drum hit (kick, snare, percussion, cymbals), to an individual instrument note or chord, and even to a vocal word, phrase, or melody. Chops are even cut up and rearranged into new loops that can become entire compositions or open to additional production and loops.
Because the potential arrangements one may be dealing with can be very particular, the mix of these kind of records generally tends to begin from a different place. A starting philosophy can be thinking about mixing what isn’t there in the song instead of thinking about mixing what is there. Let me go into a little more detail here.
If you have a sample loop track, a kick track, a snare track, and a hat track or tracks pulled up on your mixer, you notice what you don’t have is the percussion tracks, bass track or tracks, and any tracks of melodic instrumentation. All of those missing elements need to be acquired from the sample itself. Quite often when mixing these kind of records, I first find myself carefully processing the sample to bring out the bass line information as much as possible. Most of the time, this is done through surgical processing like equalization, such as filtering and notch gaining.
Other times, you may have to tighten up the dynamics of the bass information by using various forms of straight or multi-band compression before you EQ. Sometimes its better to use this compression after you EQ. I would say though, if and when you can avoid compression, avoid it.
Lastly, you might even have to consider adding some kind of sub-harmonic synthesis to get the bass to sit properly with the other low end information in the mix, which would most likely be coming from the kick and 808 (if there is one). That doesn’t always mean adding low sub tones to the sample, sometimes it means creating that upper bass register tone that doesn’t necessarily exist in the sample’s bass information.
If there’s also a key element or elements in the sample such as a guitar riff, string line, or multi instrument melody, I will do everything I can to bring that information out as well because those elements are probably what convinced the producer to use the sample in the first place.
To make things harder, occasionally the sample doesn’t always provide enough elements or information from the elements to fill out the overall sound of the arrangement. To rectify this problem, if possible (I say this because sometimes its not possible due to problems outside of your control inside the sample, such as performance and tuning), recreate the missing information by replaying and recording the missing elements on top of the sample itself. This doesn’t always work though, as it can sometimes change the overall aesthetic of what the sample brings to the piece of music. Sometimes the whole point is for the sample to sound broken and disheveled, not smooth and polished.
Now the other side to mixing sample-based Hip-Hop & House arrangements comes from the drums. To all you producers out there, drum selection should be the highest of priorities. Come on, its Hip-Hop!! The sound of the drums are of the most absolute importance, not just for the overall prosperity of the record, but also in defining the overall producer’s sound.
When a client sends in a Hip-Hop song for me to mix, especially from a producer who is very sample-centric, my main goal is to hopefully change the sound of the drums as little as possible. I do this not because I’m a lazy bastard, but because the sound of the drums is what provides the producer his signature and messing with it too much can throw off the vibe the drums give with the sample.
Another important consideration when mixing sample-based Hip-Hop and music is, “match the space.” For example, if the source sample sounds like it was recorded to a tape machine and mixed on an analog console, and the drum sounds are coming from some kind of drum machine, synth plugin, or stock drum sample pack, chances are the context of the two together won’t make a whole lot of sense. When mixing, I’m always considering what I can do to make the drums relate better to the sample, but still hit hard and poke out in the mix. This might involve processing to the drums and processing to the sample, or even both. Generally, this may involve some bit of experimentation as everything depends on the way the sample and drums sound together.
Often times, its key to “match the space.” It isn’t the easiest thing in the world; it takes a trained seasoned ear to really get it right, or a bit of luck if you’re new to the game, lol. But, you can train yourself when listening to the ambience in the sample and learn how to recreate that specific ambience around the drums.
On the other side of things, a producer may use a sample in a more complex musical arrangement. Bass, drums, percussion, main melodic instrumentation, lead instrumentation, a sample or even multiple samples. It’s all about making all the elements as close-knit as possible and narrowing the sample down to the key information or instrumentation inside of it. In a simple arrangement of just the drums and a sample, I might focus on pushing up the bass information in the sample. But in a more complex arrangement, I’ll generally be trying to remove the low end information of the sample by means of subtractive attenuation or high pass filtering.
One of the most difficult situations that comes up is when the song is composed of multiple, overlapping samples. A drum break for the groove, a melodic sample or samples, a vocal sample, and even a percussion loop, quantized or time stretched, and shaped to work together form the backbone sound of the record. This is a difficult sound to properly produce as it requires many small edits and decisive pitch shaping to get the tuning and groove right. Sometimes, things just work better when they are slightly off.
From the engineering perspective, this is one area where it is really really important to be a fan of Hip-Hop or the sample based music style you are mixing. It’s a difficult call deciding if and what elements need to be tight and together or loose with a natural swing feel. Having that natural love and appreciation for Hip-Hop goes a long way when it comes to mixing this specific style.
After that, the mixing isn’t that easy either. Usually taken from completely different genres of music, audio sources, and time periods, the overall key to getting this Hip-Hop style to work is making all the samples sound together. Regrettably, there are too many variables involved for me to provide a clear cut, step by step solution for mixing in this kind of situation, but I gotta say, equalization is gonna be your daily fuck buddy here.
All in all, the key to mixing sample-based production is understanding what’s going on in the arrangement of the record. I’m not talking about arrangement in terms of intro, verse’s, hooks, bridges, and outro. I’m talking about arrangement in terms of what each track/stem inside the mix is doing. If the arrangement you are mixing is simple and sparse, use the sample to fill up that missing space. If the arrangement is real dense, just get down to the core of what the sample is doing inside the song.
In conclusion, if you keep those drums pimpin‘, vocals clear and present, and low end super heavy, you’ll always be the boss with the sauce when it comes to mixing sample based Hip-Hop. You might even make a gangsta cry, I have.
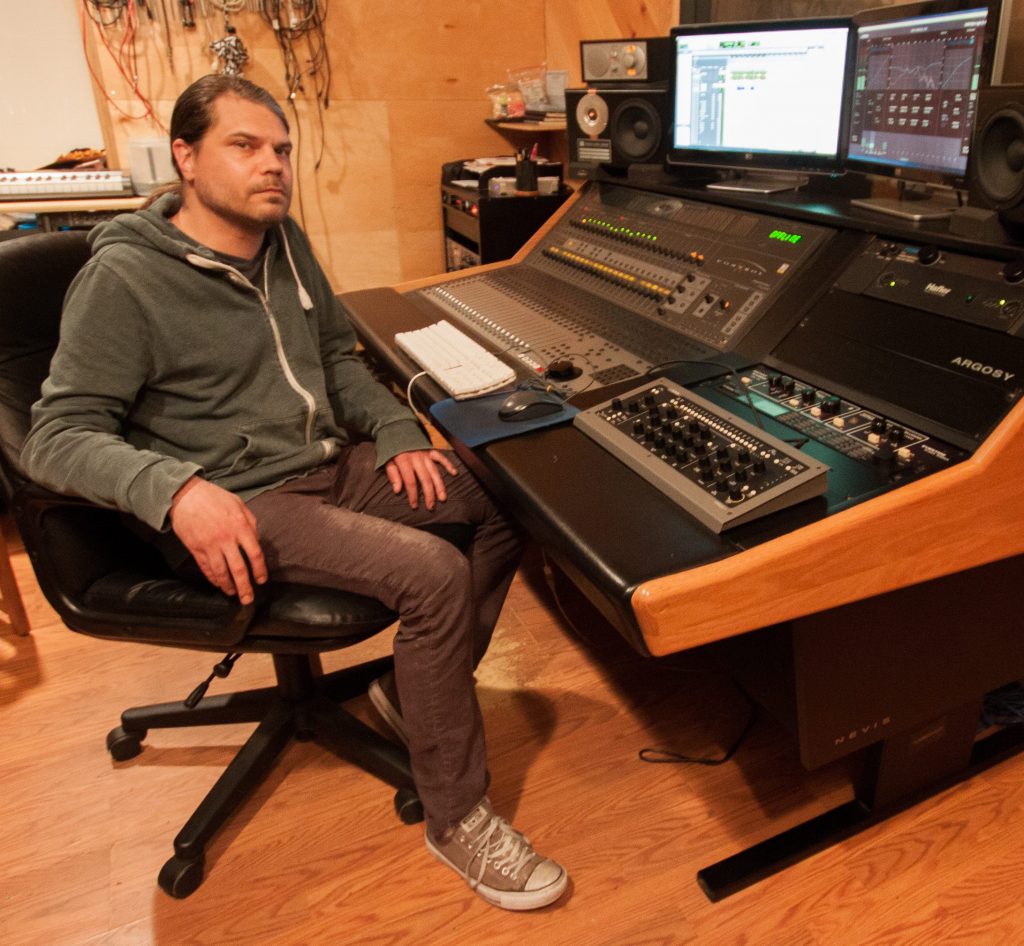
Have you ever wondered if there was a process and what the proper steps were to preparing a mix down digitally in your DAW? In this article, our veteran engineer Kris Anderson, who has worked with everybody from RKelly and 90's Industrial sensation Ministry to new artists such as Chief Keef and Lil Durk, explains the methods, reasoning and importance to preparing a mix down properly.
In today’s new wave of hip hop – full of music with insane autotune, mumbled rap, and carefree styles – Ad Libs are the icing on the cake of any song. If you didn’t already know what ad libs are – they’re the background vocals filling the open spaces of a mix, such as Travis Scott’s iconic “It’s Lit,” or a classic Migos “skrrt,” or a whispery “GANG” from Chief Keef. Certainly, ad libs can also be sung. Case in point, they’re fun and spice projects up. For an artist behind the mic, recording ad libs is often pretty wild and spontaneous – which is how it should be! However, for the engineer, there is a duty to correctly record the ad lib performance and then mix it using proper processing, and of course, cool effects. If the ad libs aren’t hot, the mix won’t come across as exciting to the artist and fans – so its good to have a few ad lib tricks up your sleeve.
Recording the Ad Libs: Ad libs should be recorded once the lead vocal and any stacking is complete. Some artists prefer to record their ad libs section by section, while others record them in one or two takes across the entire song. Many rappers will record several random ad libs and then ask for the weakest to be muted. Other artists may maintain a simple approach and not record any at all, and others record an extremely excessive amount – literally. For a group like the Migos, the ab libs function as a focal point of the recording, giving identity to the music. Since ad libs are very dynamic, its important to have the artist to back up from the microphone if he or she is planning on being extra loud. Be sure to lower the gain on your preamp to avoid clipping, which will result in needing to re-do a take. If the take was improvised, the artist will not want to re-do his performance! This isn’t a joke either – I’ve been in the studio plenty of times where the artist’s vocals are mellow across the board, and then it’s an all-out screaming fest when tracking the ad libs. Ad-libbing artists really can be full of surprises.
Mixing the Ad Libs – Plug-Ins, Effects, & Finesse: While ad libs may capture lots of attention, they still should be leveled in the background of a mix, far quieter than any lead vocals. Using your ab lib track to repeat the phrases of a chorus often is tasteful, in addition to panning ad libs from side to side with automation – creating movement and wideness. Keep in mind, any hard panning will need to be undertaken with proper gain adjustment. Ad lib effect tracks are also ideal for intros and outros containing dialogue.
Rarely do I keep ad libs dry or unprocessed. If there’s any aspect of a mix where the artist will be open to using new effects or experimental sound, its with the ad libs. Ad libs, especially with effects, can create many interesting textures, but the artist will only appreciate this kind of aesthetic if the phrases of the ad libs are clearly heard and understood. In turn, my go-to ad lib processing is the classic telephone filter, which has a catchy radio timbre that pleases the listener. What you may not already know is that the telephone filter, now a staple in industry mixes, actually had it’s inception here at Studio 11 Chicago in the late 90s. Originally synthesized using Logic DAW systems and delays, the telephone filter was used (and still is used) by Studio 11 engineers to compliment the unconventional, urban styles coming out of Chicago neighborhoods. Today, the telephone filter is popular with widespread use across the world. By the same token, many of today’s approaches mimic, but do not replicate and nail the sound on the head – so I’ll take you through the correct processing plug-in-by-plug-in (there’s more involved than just a simple filter!)
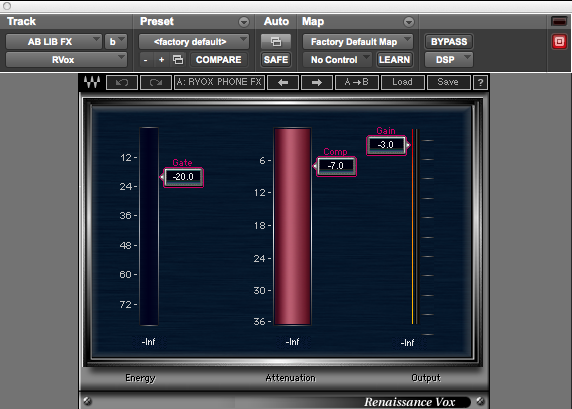
1.) Initial Compression: First things first, if we are going to create telephone filter ad libs, the vocals are going to need a healthy amount of compression. A bouncy squash from the Waves R-Vox always does the trick.
Initial Telephone Filter Compression with the Waves R Vox
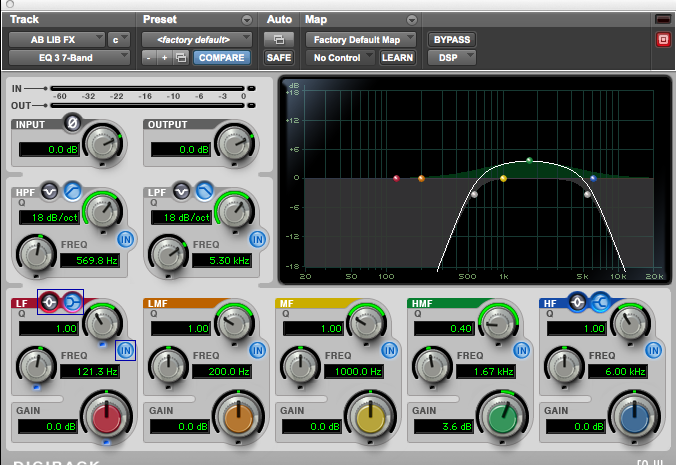
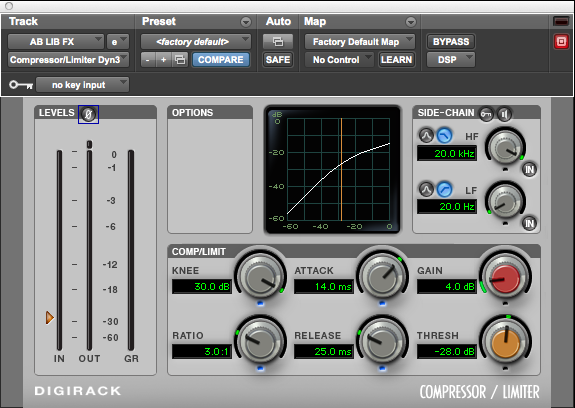
2.) Filter EQ: A basic parametric EQ works perfect for creating the filter we need. In addition to the low and high pass filters above, a boost to the remaining mid range is what truly brings out the radio, telephone-like vibe.
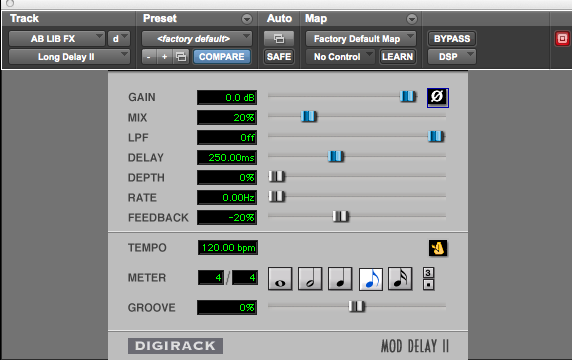
3.) Delay: A slightly noticeable echo almost always compliments the telephone filter chain. Instead of creating a send, I place the delay third in the chain and adjust the MIX parameter to dial in wetness. Eighth notes will do the trick.
4.) Lastly, apply additional compression for tone and control..
A second compressor may be useful for optimal dynamic control. Nothing crazy here!
5.) Other Cool Ad Lib Effects to Try Out…
Autotune Over the years I’ve had great responses to using autotune on the telephone filter, even if the project is not an “autotune song” so-to-speak. Try surprising your artist here. For example, many drill artists make hard-hitting singles or freestyles where autotune does not belong on the leads, yet is a great decoration on the ad libs. “Boom, boom, boom, BOOM !”
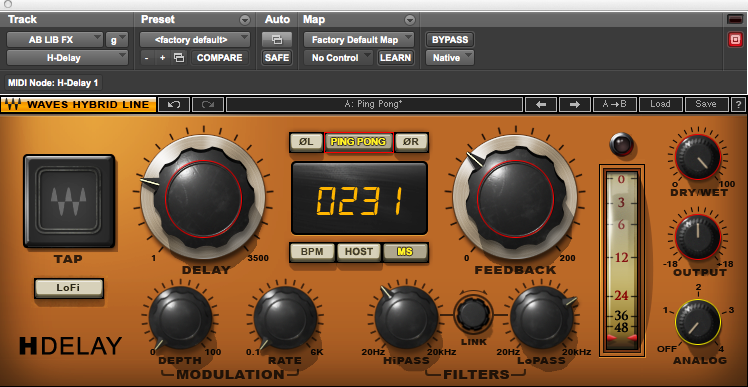
Try out some Crazy Delays
The Waves H Delay has a handful of stereo presets which work like a charm for ad libs. The “Ping Pong” setting is one of my favorites. Slap delays also can work on certain styles of music. Always beware of gain boosts on various presets, and make sure the noise, or “analog” setting in the lower right is set to off!
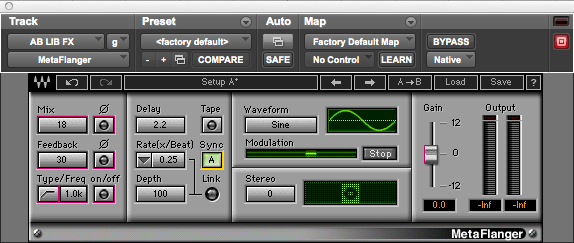
Metaflanger
The Waves metaflanger works great for creating ambient textures; I’ve always thought of the sound of this plug in as a spaceship blasting off. The metaflanger works great on atmospheric ad libs, and even on background belts for singers. Additionally, the “SYNC” parameter (engaged in the image above) allows the processor’s rate to sync with the session tempo. Moreover, the metaflanger works great on ad libs in tandem with reverb, or even distortion. The metaflanger really brings out the spaciousness of reverbs with long tails, which is why I usually place the metaflanger after any reverb in the ad lib chain. Likewise, the metaflanger also sounds best behind any distortion. The one thing to watch out for when using the metaflanger is build up of unwanted noise from processed highs. In general, a plug in like the metaflanger is most flattering by pleasantly smearing the upper mid range of a vocal, which is why it compliments the telephone filter.
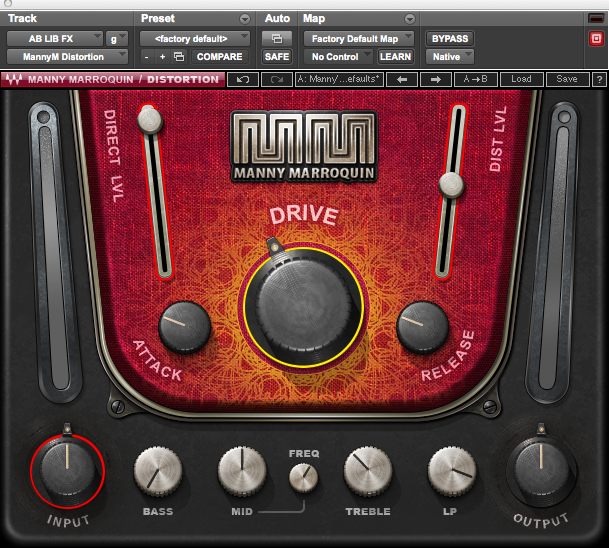
More often than not, placing distortion before the phaser or flanger sounds best. Above is Manny’s distortion from Waves.
In conclusion, make your ad lib sound count, and make it one-of-a-kind . The ad libs are a unique canvas in the mix where detail and technique matters!
Today, we are going to discuss the importance of the mix process and all the things that should be considered before and after printing the final mix of your song. After 16 years in business and thousands and thousands of satisfied clients, these are the consistent issues we face when mastering as well as mixing for clients.
In an optimal world, once music has been recorded, edited, and mixed, the final result would simply be committed to vinyl, cd or uploaded as an mp3 ready for online distribution. Nowadays, this still happens in a limited fashion, however, it is becoming more and more uncommon to do so. Being such, people who are very adept and competent mix engineers still welcome the crisp ears of the mastering engineer and final quality control before the music is released to the general consumer. However, there does seem to be a misrepresented understanding of what the actual mastering process is and what it really does. One thing is for sure, mastering a song is certainly not like mixing a song in any way. With that, the mix process is arguably the most important stage of all audio production processes.
Proper music mastering very much relies on the quality of the mix down. At this point it is imperative that the overall balance of the mix has been executed and shaped to the best of the mixers ability. All the sophisticated dynamic interplay between musicians and vocalist/singer should have been well controlled to present a clear and direct sound that expresses the overall message of the song. Once the stereo 2 track mix has been finished and rendered, it is in the mastering stage where every last bit of awesomeness is procured from the mix. This could likely involve adding things like air, clarity, depth, perceived volume, punch, sheen and warmth as well as making tweaks to the overall stereo image. Any and all of these processes when added properly can very much upgrade and enhance the final result of the mixdown. However, mastering is usually not capable of adjusting mix balances more than 0.5dB -1dB without recognizable adverse effects. This would be undertaken using regular, multi-band, parallel, or side-chain compression techniques, equalization or gain/attenuation. Therefore, it is utterly crucial that the main balances of the mix are spot on so the mastering engineer can make the exquisite, cumulative changes which add up to a bigger overall improvement to the audio. Employing a highly recommended professional mix engineer for your project would ensure that your mix down was as good as it could be.
Nowadays, most mastering engineers have a complete understanding of the shrunken budgets that are experienced in the spinning blue ball of music production. Many professional mastering engineers will offer an extra pair of fresh ears over a mix. They will provide guidance or suggest changes in the mix to ensure the best quality and sound which in turn, produces better mastering results. This will aid the artist, band, musicians or producer and the mastering engineer through better end results. In most circumstances, the mastering engineer will implement this service on the basis that the job is moving forward. Mixdowns come in many different sizes and shapes these days, and they are usually dependent on the genre or style of music. It would be quite ordinary for the mastering engineer to advocate that any very obvious issues be adjusted in the mix. A judgment is first made on the mix quality to understand how much of an assessment, if any, should be given by the mastering engineer. Also, can the person who mixed the song truly understand the advice and hear sound well enough to make the proper changes advocated. We say this because there isn’t really any point in creating a situation that an amateur mix engineer can’t work out through lack of the right equipment or experience. Anyhow, when the mastering engineer offers this advice, the artist/musician/producer should always save a copy of their original mix down in case things get a little wacky when changing and rebalancing the mix.
Below is a list of 11 different things that considerably help when preparing your mixdown for mastering, as well as just having a great mix.
11 TIPS FOR PREPARING MIX FOR MASTERING
1) Come to the conclusion that you are 100% in love with the mix or mixes. The mastering process typically isn’t going to make an amateur or rotten sounding mix come to life. The more in love you are with the finished mix, the more in love you will be with the finalized mastered version.
2) Take off any maximizers, limiters or other plugins on the master channel that are there to louden things up. Every now and then, mix engineers will quickly use some kind of clipping/limiting plugin on the master channel for the purpose of mix approvals, as well as to hear how the finished mix might potentially behave during mastering treatment. In these circumstances, this is completely okay, but always be prepared to remove these plugins or gear before sending the final mix away for mastering. This is the mastering engineer’s job after all. They deal with loudness/clipping/limiting issues after applying the eq, compression, and noise reduction treatments that may be needed during the process of mastering. Also mixes that are limited or maximized will not leave proper headroom or average peak level for the mastering engineer. Without good headroom, not much can be done without doing more harm than good to the mix. Also, mixes that have no headroom or a bad average peak level can make it hard to use analog equipment that high level mastering engineers are sought out for. In regards to other plugins on the master fader, if you are not 100% in love with what it is actually doing, just remove it.
3) Stay away from peak levels reaching 0dBFS. We observe all kinds of ideas and opinions on the inter web about where to maintain your peak levels pre-mastering. There really isn’t any magic number for what that peak level should be before mastering. Just have it firmly burned into your brain that the level is not 0dBFS.
This concern is largely pointed towards those individuals who mix “in the box”. If you are mixing on an analog console and rendering a stereo mix back to a digital audio interface of some kind, it’s actually much easier. Just don’t clip the input on the way back to the interface, and definitely do not apply any further digital processing, unless it is for fx or post production purposes. When you export the newly captured stereo mix, make sure you export it at the native sample rate and bit depth of the session, unless you are mixing from analog or digital tape. The mastering engineer can take care of the rest.
4) The bounce or render of your mix should be done at the same sample rate and bit depth as the mix session in your software. Let the mastering engineer take care of any bit depth or sample rate conversions as the high level ones usually work using top of the line converters. There really isn’t a perfect bit depth/sample rate to record or work at, but it is best to not augment the bit depth/sample rate when you make the final render of your mix mastering. Your DAW’s SRC is probably not the greatest, so don’t be discouraged and just don’t use it.
5) Its super beneficial to get into the habit of having a separate analytical listening session before sending your project off for mastering. Attentively listen to the beginning and end of the song or songs going to mastering for any potential stray clicks, pops, noises and irregularities. Get rid of anything you do not want, but do it carefully.
6) In solo mode, check out each of the vocal tracks that are in your mix to double check for any missed garbage like clicks, pops, thumps, plosives, headphone bleed, etc. When all the tracks in the song are playing together, it might be tough to hear these anomalies in the mix. In our experience, vocals frequently are the cause of most undesirable noises in a track. Also check for things like bad edits or crossfades that could potentially cause noise and clicks/pops. These irregularities aren’t always easy to hear prior to mastering in the framework of a full mix when the mix engineer’s attention is focused on more important things like balance and fx. But after mastering, this garbage can become more noticeable and unnaturally transparent. In a mastering room with a high end playback system and low noise floor, these noises and such are much much easier to hear, take our word for it. It’s commonplace for us to edit out a few random noises and clicks/pops when even mastering music mixed by some of the best mix engineers out there. At the end of the day, it’s not difficult to edit these things out in mastering, but it is always welcomed when it is minimal.
7) If you think there is any kind of chance that an instrumental, performance, radio or other versions of the songs will be needed, make them right away when you print the final original mix. It’s not difficult to master these different mix versions at the same time the main mixes are mastered. Going back to master these different versions on a later date can become a lot more costly and time consuming, especially if the mastering DAW session wasn’t saved or settings weren’t documented on the gear used. In addition, in situations where analog gear is used during the mastering process, doing all of these versions at the same time ensures much better continuity between the main, instrumental, performance, radio or other versions.
8) Always leave time before or after the mix to include any potentially precarious noise (buzz/hiss/hum/room tone). Keeping the noise floor/fingerprint in the mix allows the mastering engineer, if needed, to apply transparent noise reduction. Hastily fading out the noise, or editing the beginning and ending of a song very tight usually hinders any transparent noise reduction from being dealt with by the mastering engineer. Cutting of the heads and tails of the song during mastering takes hardly any time at all, but having some of that noise floor to work with can be very useful. Trimming the heads and tails during mastering doesn’t take much time at all, but leaving some of that noise floor for the mastering engineer to work with can be very useful. So just leave it in. Occasionally we will use a small amount of noise reduction on just the very beginning or very end of a song as the last note rings out, but not on the entire song. What helps the most is having a little noise to sample from.
9) Additionally, make sure the timeline selection of the mix you are printing doesn’t cut off any information at the start or end of the song. This can happen when the mix involves a lot of DSP intensive plugins which have a tendency to delay the audio slightly. This is another reason why its always a good idea to leave more space on both ends to be safe. Trimming is easy for the mastering but finding a problem like this at the 11th hour is not ideal and definitely not easy to correct if the problem is extreme.
10) Give the printed mix files a name that is easy to understand. Here at Studio 11, we always avoid using the word FINAL when naming files. Also, using dates or times in the file name can also become confusing to look at as everybody has a slightly different dating system. Digital files these days have time/date stamps anyway, so we always prefer a simple V1, V2, V3, etc or even just 1, 2, 3 etc. for every version. Overall it’s simpler and much easier to deal with.
11) Lastly, if there is only one thing you take away from this information, it is this and coincides with what we have been saying:
LISTEN TO THE FINAL PRINT OF THE MIX TO ENSURE A PLUGIN OR DAW GLITCH DID NOT OCCUR BEFORE DELIVERY TO MASTERING.
These kind of things happen way too often: We will deliver a master back to a client, only for them to discover that a certain plugin in their mix session had a problem that did not occur during playback, but managed to happen during rendering/bouncing and wasn’t double checked. If the clients would have listened to the actual file after the fact, it would have been an simple to fix. Catching it after mastering has been completed can be a gigantic problem, especially if your mastering engineer used analog gear as many do.
So you’ve done it. You made, or received your first song with over 50 tracks, and it’s ready to be mixed down. You have 30 drum channels, 10 synths, 10 vocals, 2 bass tracks, and 10 SFX/ambient tracks. Where do you start?
A big part of mixing that often gets over looked is the part where you are supposed to enjoy it (it’s why your in this business in the first place right?). Mixing should never be frustrating, and should always keep moving while the juices are flowing. Because lets face it, it’s no fun if you are spending more time looking for a sound in a sea of tracks, then actually mixing the song. So it’s wise to first organize them in some sort of order to avoid wasting time and confusion.
Track Organization:
Everyone has their own process, but it seems commonplace that engineers (including myself) usually start with drums on the top of the session and proceed down from there. Traditionally it will look something like this (from top to bottom) : Kicks, Snares, (Claps), Hi Hats, Toms, (Overheads), Cymbals, Percussion, Bass. The rest of the tracks such as guitars, strings, synths, piano, and vocals tend to vary more on personal preference. I tend to arrange my tracks based on the order I’m going to mix them in. Drums typically get treated first (because drums are the backbone of a song and need to sound good first), then I proceed to Bass to make it sit right with the kick drum, then melody/ or vocals. Again there is no correct way to do this, (in fact I know some engineers that start with vocals first and carve around that because they deem that the most important part of the song). So your order doesn’t have to be exactly this but it helps if you have a formula with all your sessions, so that after a while you can identify the location of a track without even thinking about it. Next, clearly label the track, and Id even recommend color coding them for easier identification (most DAWS will let you do this). And similar to keeping a consistent order of the tracks from session to session, it’s also a good idea to keep a consistent color for each instrument group (For example, my drums are always red, instruments green, and vocals yellow.)
So now you have the order of the tracks, but you still have over 50 tracks to keep count of and work together. First, take a look at what you have and decide if the song actually needs all of those tracks. For example, do you really need 3 layered hi hats? Is it important to the song? If it’s your song, then take a listen and strip down what you don’t need ( however, if it’s for a client be wary of deleting tracks without asking them first.) If you explain to them that it’s not adding anything to the track and gets in the way of other sounds, then chances are they won’t mind if you get rid of them. In mixing less is always more, which is why usually my next step is to combine similar sounds together via a bus to a single mono or stereo track, grouping them together, or assigning them to the same output to create a submix.Before doing this, it is important to listen for sounds that sit in the same frequency range that can be processed similarly. For instance, it would be unwise to group together a bass and vocal track, because they are going to be processed quite differently during the mix down. The first thing that should be consolidated into a single track would be all channels in your DAW containing overdubs of the same instrument. So if you have 3 guitar tracks, recorded with the same, or similar tone, with the same mic etc, level them together then consolidate that to one track .Next look for tracks like similar background vocal harmonies, hi hats, similar sounding percussion (bongos, congos) and consolidate them.
They key here is to reduce the track count , and stay organized as much as possible so you can focus more on mixing, and not finding. Some engineers may prefer to have the most available options for the mix down, keep everything separate, and not worry as much about the organization of the session, which is fine. Whatever works best for you, is the best way. But unless you are working on a 50+ channel console or control surface, and have a photographic memory, staying organized and consolidating tracks to keep the track count down is less time consuming, visually easier, and will lead to a more efficient mixdown.
Dan Zorn, Engineer
Studio 11 Chicago
209 West Lake Street
For inquiries about scheduling a tour, or booking time call us at 312 372 4460, or drop us a line at studio11chicago@gmail.com